Components
Golf Simulator Components: The Full Parts List
As an Amazon Associate, this website earns from qualifying purchases.
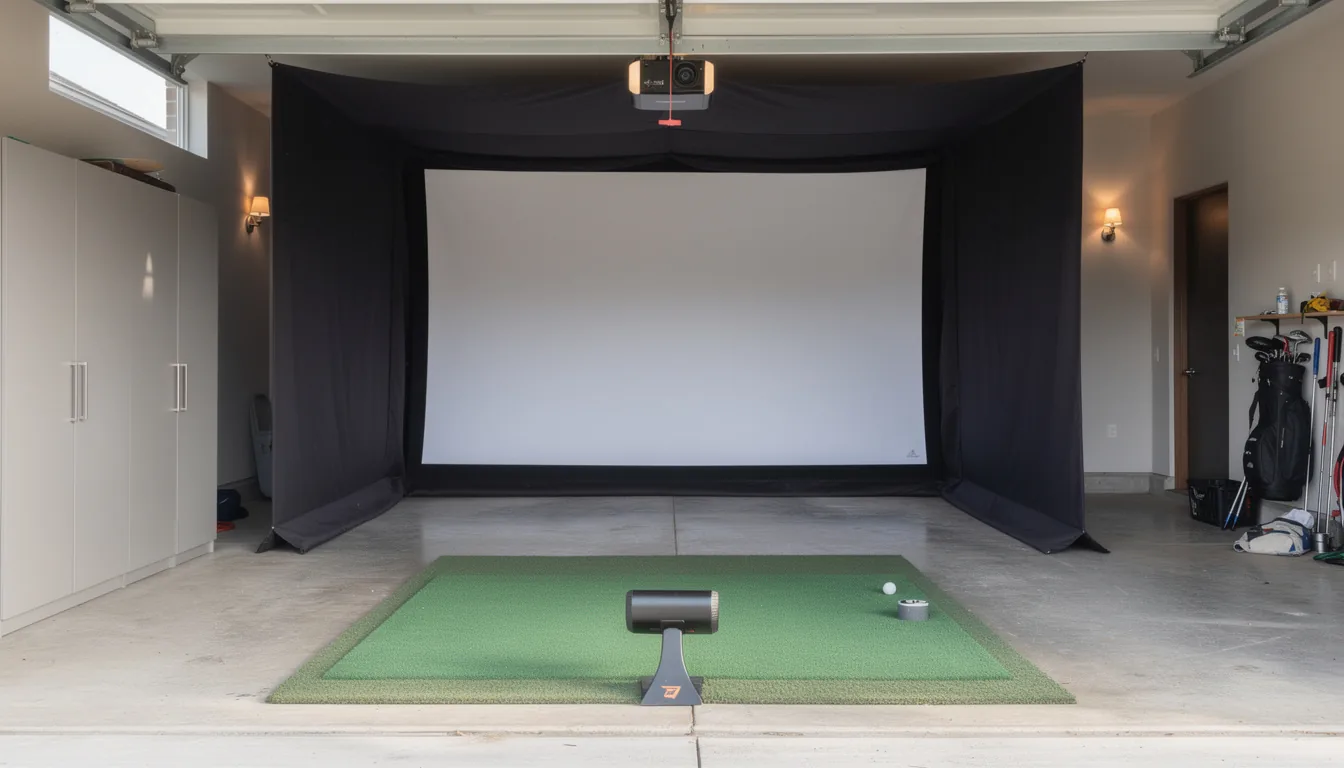
A complete build needs seven golf simulator components: a launch monitor, a hitting mat, an impact screen or net, an enclosure, a projector, software, and flooring, and your room measurements decide which launch monitor you get to pick first.
Sections11
- What a Complete Golf Simulator Build Includes
- Your Launch Monitor Sets the Room Layout
- Hitting Mat: The Part Your Wrists Notice
- Impact Screen or Net: Two Different Builds
- The Enclosure Turns Loose Parts Into a Bay
- Projector: Throw Ratio Before Brightness
- Software and the PC Behind It
- Flooring Gets Bought Last and Regretted First
- How Golf Simulator Components Limit Each Other
- What Order to Buy Golf Simulator Components
- Golf Simulator Components Verdict
A full golf simulator build takes seven golf simulator components: a launch monitor, a hitting mat, an impact screen or net, an enclosure, a projector, software, and flooring. Buy them in the wrong order and you will pay for the same part twice.
That is the part most build guides skip. These pieces are not a shopping list you can tick off in any order. Each one narrows what the next one can be.
Your ceiling height rules out enclosure sizes before you have chosen one. Radar tracking needs floor space a short garage simply does not have. And it is screen width, not budget, that picks your projector.
This page walks through what each part does, then shows how they hem each other in and the order that keeps you out of trouble. When you want to put numbers to any of it, the build-cost calculator handles the budget side, since this page stays on gear and fit.
For the overall golf simulator cost before choosing parts, compare the five home-build budgets.
What a Complete Golf Simulator Build Includes
Ready to compare actual equipment? Use the component shortlists by build level for product images, fit differences and retailer buttons. The calculator also links each line item to a shortlist for its budget.
Seven parts show up in almost every home bay. Three of them are required. The other four are what separate a corner practice net from a room that feels like a golf club.
- Launch monitor: reads the ball and the club, then hands numbers to the software. This is the brain of the build.
- Hitting mat: the surface you actually strike. It protects the floor under it and your wrists above it.
- Impact screen or net: stops the ball. A screen also doubles as the projection surface. A net does not.
- Enclosure: the frame and fabric that hold the screen square, catch stray shots, and block room light.
- Projector: throws the course image onto the screen from a short distance.
- Software and PC: turns the launch monitor data into a course, a range, or a practice drill.
- Flooring: the turf, foam, or subfloor that surrounds the mat and levels the whole hitting area.
You can hit balls with just the first two plus a net. Everything after that buys image quality, safety, and comfort. If you are assembling the basket yourself, compare enclosure kits at Indoor Golf Shop after the room measurement and launch-monitor choice are fixed. Use the free Golf Simulator Build Planner to keep those measurements together.
Your Launch Monitor Sets the Room Layout
Pick the launch monitor before you pick anything you have to bolt to a wall. It is the one part that dictates where you stand.
Launch monitors split into two camps. Radar units sit behind the golfer and track the ball down range, so they need clear floor behind the tee. Camera-based units sit beside or above the ball and read it at the strike, so they need far less room front to back.
That gap is real, and it is measured in feet. FlightScope says its units want at least 16 feet total front to back: 8 feet behind the ball and 8 feet from ball to screen. GolfBays lists 13.1 feet for camera systems against 16.4 feet for radar in the same room guidance. Pick radar in a short garage and you will be standing with your back against the door.
Ceiling matters just as much. FlightScope calls 9 feet an absolute floor and 10 to 12 feet comfortable for taller players. Our room size guide and the ceiling height page cover the swing-arc math in full. For unit-by-unit tracking differences, start at the launch monitor overview.
Hitting Mat: The Part Your Wrists Notice
The mat is the only piece of gear you hit thousands of times, and it is the first one to wear out.
Cheap mats give nothing at impact. The club bounces off a thin fibre layer and hard floor underneath, and your lead wrist absorbs the difference. Thicker mats let the club dig a little, which reads closer to a real fairway divot.
Wear is normal, not a defect. Shop Indoor Golf says a SIGPRO Softy can last about a year with steady use, and a narrow hitting strip four to six months. Treat the mat as something you replace, not something you buy once.
Mat height comes straight off the available swing clearance, so check the exact mat's finished thickness before ordering an enclosure. Compare six hitting-mat options once you know your stance area, or read the flooring page first so the mat and surrounding floor can sit flush.
Impact Screen or Net: Two Different Builds
This is the fork in the road. A screen build and a net build cost different amounts of room, not just different amounts of money.
An impact screen stops the ball and carries the projected image at the same time. That is what makes a simulator look like a simulator. Screens are usually three layers of tight-knit polyester, and Carl's Place rates its premium screen for ball speeds up to 250 mph.
A net just stops the ball. You read your numbers on a tablet or a side-mounted TV. Net builds fit in shorter, lower rooms, they cost less room and less setup time, and they are far easier to take down.
Neither is wrong. A net is the right first step for a lot of garages, and it upgrades cleanly later. Read the full comparison on the impact screen page and the golf net page before you commit to a wall.
The Enclosure Turns Loose Parts Into a Bay
An enclosure is the frame plus the fabric surround. The frame holds the screen flat and square. The fabric catches shots that miss the screen and soaks up room light so the image stays punchy.
Frames run from light steel poles that click together to 2-inch EMT conduit in commercial bays. Elite Sim Golf lists 45 to 60 minutes of assembly on its Eagle 12 frame and 60 to 90 minutes on the wider Albatross 13S. Carl's Place Pro kits weigh 180 to 260 pounds with fittings and fabric, which tells you something about how permanent they are once built.
Skipping the enclosure is a valid choice in a finished basement with light walls. In a garage with exposed studs, the fabric surround is doing safety work, not decoration. The enclosure page covers kit frames against DIY builds.
Projector: Throw Ratio Before Brightness
Most people shop projectors by brightness and get burned by throw ratio. Throw ratio is how far back the projector has to sit to fill a given screen width. In a simulator you have almost no room to sit back, so you need a short-throw unit.
Cero Golf gives a worked example: a short-throw laser with a throw ratio of 0.69 to 0.83:1 needs roughly 2.4 to 2.9 metres from the screen to fill a 3.5-metre wide image. Get that number wrong and the image either overshoots the screen or floats in the middle of it.
Brightness comes second. aboutGOLF recommends at least 3,000 lumens for most builds. Cero Golf puts 3,000 to 4,000 lumens as standard for premium home rooms. Rogue Engineer went further and used a BenQ LK936ST rated at 5,100 lumens in his documented home build. Once you know your screen width and mount distance, browse short-throw golf simulator projectors at Indoor Golf Shop with those two numbers in hand.
Mount position matters too. Ceiling mounting keeps the beam clear of your backswing. Floor mounting is cheaper to rig and much easier to knock out of alignment.
Software and the PC Behind It
Software is what makes the numbers into golf. GSPro and E6 are the names that come up most in home builds, and each one supports a specific list of launch monitors.
Check that list before you buy either piece. A launch monitor your software cannot read is an expensive paperweight, and this is the single most common mismatch in a mixed-brand build.
The PC is usually the last thing people budget for and the easiest to underspend on. Course rendering leans on the graphics card far more than on the processor. If you already own a gaming PC, you are most of the way there.
Flooring Gets Bought Last and Regretted First
Flooring is the part that turns a hitting station into a room. It is also the part people leave until the money is gone.
The problem is height. Your mat, your turf, and any subfloor all stack up, and every inch of stack is an inch of ceiling you no longer have. Foam tiles from Carl's Place run 1.25 inches thick on their own. Add turf on top and you have moved the ball closer to the ceiling before you have swung.
Getting the floor right also lets you set the mat flush with the surrounding turf, so there is no lip to catch a toe or a club. That flush look is what separates a finished room from a pile of gear. The golf simulator flooring guide covers subfloor options, turf pile, and what wrecks a floor early. If putting matters to you, the indoor putting green page covers roll surfaces.
How Golf Simulator Components Limit Each Other
Here is the chain that catches people out. Every link sets the one after it.
- Room sets the launch monitor. Short front-to-back space rules out radar. That is a hard limit, not a preference.
- Launch monitor sets the stance position. Camera units want the ball in a fixed spot relative to the unit, which fixes where your mat lands.
- Room width sets the screen size. Carl's Place asks for 2 to 3 inches between the frame and the side wall for tensioning and airflow.
- Screen size sets the projector. Width plus mount distance gives you the throw ratio you must shop for.
- Enclosure height sets your true ceiling need. Carl's Place says the room should be at least 6 inches taller than the enclosure you choose, so a 9-foot enclosure wants a 9-foot 6-inch room.
- Mat and floor stack eat that clearance back. Two inches of mat plus turf comes straight off your swing room.
- Screen needs breathing space behind it. Carl's Place asks for 12 to 16 inches of clearance between the screen and the wall so the ball's energy has somewhere to go.
That last one bites hard in garages, where people push the screen flat against the back wall to save room. Elite Sim Golf also recommends standing 10 to 12 feet back from the screen for safety. Our garage build page covers the tight-room workarounds.
What Order to Buy Golf Simulator Components
Follow this order and each purchase is made with the previous answer already in hand.
- Step 1: Measure the room. Width, height, and front-to-back clear space, measured to the nearest inch with the door open.
- Step 2: Buy the launch monitor. It is the part your room either fits or does not. Everything else has size options.
- Step 3: Pick the screen or net, then the enclosure. These get sized to your room and your stance position together.
- Step 4: Buy the projector. Only now do you know the screen width and mount distance that set your throw ratio.
- Step 5: Buy the mat. Size it to your stance and to how much of the floor you want covered.
- Step 6: Lay the flooring. Do this after the mat arrives so you can set the two flush.
- Step 7: Sort software and the PC. Match the software to the launch monitor you already own.
An enclosure kit can match the frame and screen for you. Compare enclosure kit sizes at Indoor Golf Shop, checking exactly what is included before budgeting for the monitor, projector and mat separately. Building it yourself takes longer and needs more measuring, and the DIY build page covers that route. For how the whole spend breaks down by tier, start with the cost guide.
Golf Simulator Components Verdict
The seven golf simulator components are not equal partners. The launch monitor and the room decide the build. The screen, enclosure, and projector have to agree with each other on size and distance. The mat and flooring are the two you will touch every single session, which is why leaving them to last so often backfires.
Measure first. Buy the tracking gear second. Let every other part fall out of those two answers, and you will only buy each piece once.
Quick answers
What components do you need for a golf simulator?
Seven parts make up a full build: a launch monitor, a hitting mat, an impact screen or a net, an enclosure or frame, a projector, simulator software with a PC, and room flooring. Only the launch monitor, the mat, and something to stop the ball are truly required. The rest turn a practice station into a room you want to spend time in.
Can you build a golf simulator without a projector?
Yes. Plenty of golfers run a net build and read their numbers off a tablet or a TV mounted to the side. You lose the projected course image, so the practice feels more like a range session than a round. You can add a screen, an enclosure, and a projector later if the room allows it.
Which golf simulator component should I buy first?
Measure the room first, then buy the launch monitor. Radar units need clear space behind the ball, and camera units need less, so the unit you pick sets your whole floor plan. Buying a screen or an enclosure before the launch monitor is how people end up with a bay that will not fit the tracking gear.
Do golf simulator components have to match brands?
No. Most home builds mix brands freely: one company's launch monitor, another company's screen and enclosure, a third company's mat. What matters is that the software runs your launch monitor, and that the physical sizes work together in your room. Packaged kits pre-solve that matching for you.
How long do golf simulator parts last?
The hitting mat wears out first because it takes every strike. Shop Indoor Golf says a SIGPRO Softy mat can last around a year with regular use, and a narrow hitting strip four to six months. Screens, frames, and turf usually outlast the mat by years when the room stays dry.